3D Wooden Puzzles: Book Nook Kits That Turn Your Bookshelf into a Miniature World
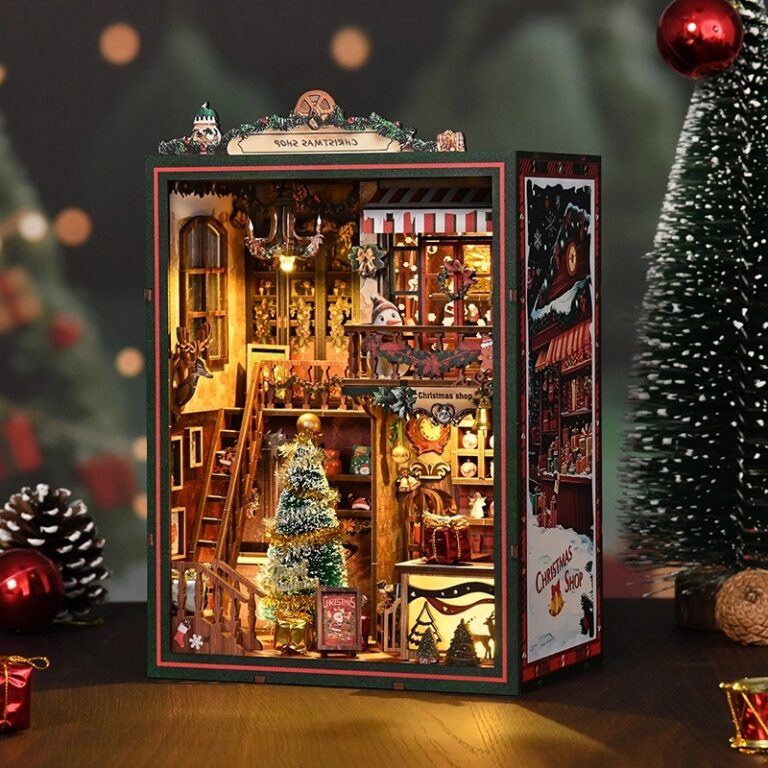
Book nook kits are a fast-growing niche within 3D wooden puzzles: laser-cut wooden model kits designed to build a detailed miniature “scene” that fits between your books like a decorative bookend. If you enjoy hands-on crafts, model building, or simply want a statement piece for your shelf, a 3D wooden puzzle book nook kit is one of the most satisfying projects you can finish in a weekend—then enjoy for years.
What Is a Book Nook Kit?
A book nook (sometimes called a “bookshelf insert”) is a narrow diorama built to the approximate size of a hardback book. Most book nook kits are made from pre-cut plywood or basswood sheets that you assemble into an architectural frame, then layer in scenery—streets, alleyways, libraries, trains, fantasy shops, or cozy reading corners. Many kits also include:
- LED lighting (warm white or color-changing) to create depth and ambience
- Transparent films for windows and signage effects
- Stickers or printed parts for posters, book spines, and decorative details
- Optional dust covers (acrylic panels or add-on cases) for long-term display
Why Book Nook Kits Are So Popular Right Now
As a category of 3D wooden puzzles, book nook kits combine the “click-together” satisfaction of a puzzle with the creative payoff of a miniature model. Their popularity is driven by a few big advantages:
- Compact display: Unlike large wooden models, a book nook fits right into existing shelving.
- High detail per inch: Layered parts and forced perspective create an immersive look.
- Gift-friendly: Book lovers, crafters, and teens often enjoy them equally.
- Mindful build experience: Many builders describe the process as relaxing and screen-free.
Choosing the Best 3D Wooden Puzzle Book Nook Kit
Not all 3D wooden puzzle book nook kits are built the same. Use the checklist below to find a kit that matches your skill level, tools, and bookshelf.
1) Skill Level and Build Time
- Beginner: Larger pieces, fewer tiny details, simpler wiring (or pre-wired LEDs).
- Intermediate: More layers, detailed signage, multiple sub-assemblies.
- Advanced: Micro details, complex lighting, tighter tolerances, heavier customization.
Most book nook kits take 4–12 hours depending on complexity and whether you paint/stain.
2) Materials and Fit
Look for high-quality laser-cut wood with clean edges, minimal burn marks, and clear part numbering. Check the finished dimensions and compare to your shelf spacing. Typical width is roughly 4–6 inches, but variations are common.
3) Lighting and Power
Lighting makes a book nook feel like a real world. Prefer kits that specify:
- LED type (warm/cool, brightness)
- Power source (battery box, USB, or both)
- Wire routing guidance and switch placement
Tip: If you plan to run multiple book nook kits on one shelf, USB-powered options can reduce battery waste and maintenance.
4) Theme and Shelf Aesthetics
Pick a theme that complements your library. Popular book nook kit styles include:
- Old-town alleyways with lanterns and storefront signs
- Cozy libraries filled with mini books and ladders
- Train carriages and stations
- Fantasy streets inspired by classic story settings
How to Build a Book Nook Kit (Clean Results, Fewer Frustrations)
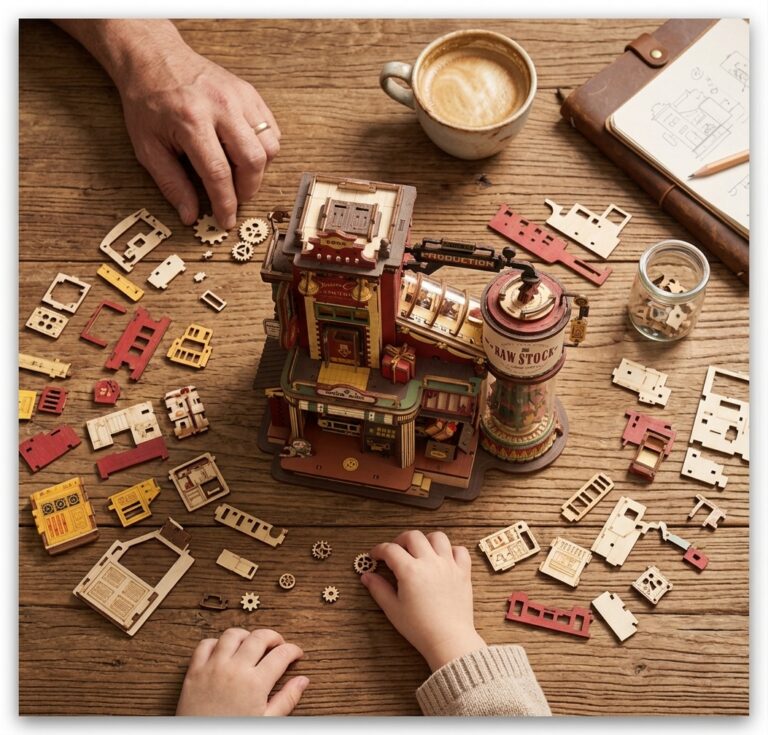
Most book nook kits follow the same build logic: frame → floors/walls → layered scenery → lighting → finishing. These practical steps help your 3D wooden puzzle build look professional.
Prep Your Workspace
- Use a tray or shallow box to hold small pieces.
- Label parts as you punch them out to avoid mix-ups.
- Keep a soft cloth handy to remove soot marks from laser cutting.
Dry-Fit Before You Glue
Even with precision laser cutting, dry-fitting prevents misalignment. Many kits can snap together, but a small amount of glue improves long-term stability—especially for vertical walls and lighting channels.
Lighting: Test Early, Not Last
Before you seal the roof or back panel, test LEDs and switches. If the kit uses simple circuits, learning the basics helps; a reliable reference is the educational guide on LED fundamentals from Adafruit: https://learn.adafruit.com/all-about-leds.
Finishing Options: Leave Natural or Customize
- Natural wood: Clean, modern look; great with warm lighting.
- Stain: Adds depth and hides minor burn marks.
- Acrylic paint: Ideal for signs, brickwork, and weathering.
If you want a dependable overview of safe craft adhesives and how different glues behave with porous materials, see the Titebond knowledge base: https://www.titebond.com/resources/choosing-the-right-glue.
Common Problems (and How to Fix Them)
Parts Feel Too Tight
Lightly sand tabs and slots with fine-grit sandpaper. Avoid forcing pieces—splits are harder to repair than a quick sand.
Warping or Bowed Panels
Store sheets flat before building. If a panel is bowed, gentle clamping during gluing can help. Use minimal moisture; excessive wet glue can increase warping.
LEDs Don’t Turn On
- Check battery orientation or USB connection.
- Confirm the switch is installed correctly and not pinched by panels.
- Inspect wire joints—some kits use pre-tinned wires that still require a firm connection.
Book Nook Kit Ideas: Make It Look Custom
One reason 3D wooden puzzles remain popular is how easy they are to personalize. Consider these upgrades:
- Add mini book spines: Print tiny covers on cardstock that match your favorite authors.
- Weathering: Dry-brush edges to make bricks and wood beams feel aged.
- Diffused lighting: Add tracing paper behind windows to soften hotspots.
- Nameplate: A small engraved label makes it feel like an exhibit piece.
Where Book Nook Kits Fit on a Bookshelf
For best visual impact, place a book nook between books of similar height so the frame blends into the row. If your shelf is deep, position the nook slightly forward to prevent shadows from swallowing the details. Many builders also place a small mirror behind the nook for added perceived depth.
Internal Reading: Related 3D Wooden Puzzle Topics
If you’re exploring more 3D wooden puzzles beyond book nook kits, these related guides can help you build a complete collection:
- 3D Wooden Puzzles for Adults: How to Choose the Right Difficulty
- Wooden Model Kits with LED Lights: Power, Wiring, and Display Tips
- Miniature Diorama Building Tips: Finishing, Weathering, and Scale Illusions
Trusted External Resources
- LED basics (Adafruit Learning System): https://learn.adafruit.com/all-about-leds
- Choosing the right wood glue (Titebond): https://www.titebond.com/resources/choosing-the-right-glue
- General safety guidance for hobby tools (U.S. CPSC): https://www.cpsc.gov/Safety-Education
FAQ: Book Nook Kits
Are book nook kits the same as miniature dollhouse kits?
They’re related but not identical. Dollhouse kits are typically open-front rooms meant for tabletop display. Book nook kits are designed as narrow shelf inserts with forced perspective, often with a roof and side walls to control lighting and shadows.
Do book nook kits require glue?
Many 3D wooden puzzle book nook kits can be assembled friction-fit, but glue is recommended for durability—especially for vertical panels and small decorative layers.
What tools do I need?
Usually: hobby knife, tweezers, small clamps or rubber bands, sandpaper, and a clear-drying craft glue. If the kit includes LEDs, a small screwdriver helps with battery boxes. Some advanced kits may benefit from a low-temperature glue gun for wire management.
Are book nook kits good gifts?
Yes—especially for readers and crafters. When gifting, match the theme to the recipient’s taste (library, street scene, fantasy) and choose a difficulty level that suits their patience and experience.
Conclusion: A 3D Wooden Puzzle You’ll Actually Display
A well-chosen book nook kit is more than a weekend craft: it’s a shelf centerpiece that adds depth, warmth, and story to your home library. By selecting the right difficulty, testing lighting early, and taking time with finishing, you can build a 3D wooden puzzle book nook that looks polished, personal, and worth a second look every time you pass your bookshelf.